So you’re thinking about starting a travel blog? Well, I think you’re making an absolutely excellent decision! I started this website back in 2014, and it’s truly one of the best decisions I’ve made in my entire life! I love my career a travel-blogger, being apart of this amazing community, and helping / inspiring people around the world.
I started this travel-blog strictly as a hobby, but now it’s become my full-time job! I never thought I’d make it this far, and never planned on becoming a professional traveler – but it’s been so cool to see all my hard-work the past few years pay off!
Because of this website and my social-media channels, I’ve gone on fully funded trips across New Zealand, Australia, Israel, India, and Indonesia (just to name a few). I’ve partnered with massive companies like Qantas, GoPro, and Chase for exciting travel and music festival campaigns!
This travel-blog has shaped the man I am today, and my only regret is not starting sooner! I have been living and working abroad since 2011 (read my About Me page for my full story), and I could only imagine what I would have accomplished with this site if I had started right at the beginning.
If you’ve been thinking about starting a travel blog for awhile now…my biggest piece of advice is STOP PUTTING IT OFF, and DO IT NOW! Even if you don’t update it regularly, it’ll always be something nice to look back at as you document your travels.
I’ve recently been enjoying looking back at my yearly recap articles, and it’s been tons of fun to reminisce about all that I’ve done in the past few years of my life. Read all about them here: 2014, 2015, 2016, and 2017.
I want this article to INSPIRE you to finally embark on your travel-blogging journey.
With that being said – if you’re solely starting a travel blog with the intention of making money, then this might not be the best decision. It takes A LOT of time, energy, and motivation to produce a decent income from a website, but it’s definitely possible! The most important thing is that you are truly 100% passionate about travel, photography, story telling, and content creation! If you ever have any questions about the lifestyle / process of becoming a full-time travel blogger, feel free to email me, and I’m more than happy to help out.
So let’s get started! This 5-step process is SUPER SIMPLE, and will not take more than 10-15 minutes!
How To Start a Travel Blog in 5 Easy Steps
- Pick Your Name & Niche
- Buy Your Domain & Set-Up Web Hosting
- Install WordPress (The Best Blogging Platform)
- Picking a WP Theme & Essential Plugins (Designing your Website)
- Start Writing Content (Pages, Categories, and Articles)
1 ) Pick Your Name & Niche
What’s your travel blog all about? Are you going to write about your personal travels or maybe a specific destination blog? Have you been brainstorming names already?
It’s important to remember – It’s all in the name!
This is your new company. It’s your brand. You want to be proud of it, and be stoked about sharing it with people. Will the name look good on a t-shirt or hat…? ;-)
Keep in mind that there are always a lot of established travel blogs out there already, so you don’t want to copy anyone else, or be unoriginal. It might take some time to think of something good, but the idea will come! You can use BlueHost to check the domain availability after the sign-up page.
Fun fact – I actually used to hate my website’s name “Jones Around The World”…but now I love it! I think it’s a fun brand, it’s easy to remember, and definitely demonstrates what the site is all about (my international adventures).
Picking Your Blog Name Tips
1 ) Find something original! While that might seem a bit bit vague…you really want to figure out a way to stand out, and be super memorable.
2 ) Short & Simple! I personally think the best brands are max 2-3 words, and never more than around 14 characters. I actually enjoy blogs that start with the word “THE”…(as long as what follows is fun)
3 ) Easy & Professional URL! Avoid any hyphens or numbers, and definitely keep your blog name classy. Don’t use any swear words, or anything R-rated.
4 ) Keep SEO in Mind! If you don’t know, SEO stands for “Search Engine Optimization”, and your domain name can be a huge benefactor in landing on Page 1 of Google. This is especially true if you’re planning on blogging about a specific destination / region of the world. For example “TheEuropeanExpert” would give you a bonus for any content related to Europe. Does that make sense?
5 ) Check Social-Media for existing accounts! If you’re starting a travel-blog, social-media channels are going to be play a big part. You want to make sure no one else has already acquired your desired travel blog name on Facebook, Instagram, Twitter, Youtube, Snapchat, and Pinterest.
6 ) Always Acquire the .COM !! There’s a lot of reasons for this, but it just makes the most sense. It’ll be the most professional, look the best on a business card, and easier to share with people.
2 ) Buy Your Domain & Set-Up Web Hosting
So you’ve picked your new travel-blog name!? CONGRATS!
Now it’s time to buy that domain, and set-up your web-hosting for your new website! This process is really simple, and I’d recommend doing all of this through BlueHost. They’ve got an amazing service, the best prices, and it’s simply the best webhost for starting a new site.
When I first started out, I made things a lot more complicated than they needed to be, and used the free wordpress version, which meant the first version was “www.jonesaroundtheworld.wordpress.com”! DON’T DO THIS. It was a pain in the ass to change later, and actually caused a lot of issues (which were finally all resolved).
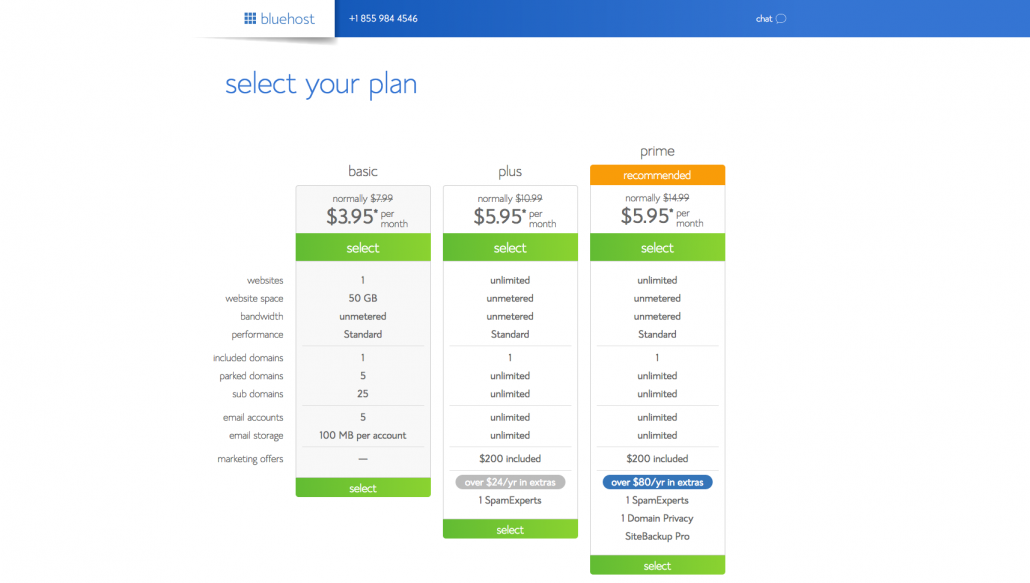
Select Your Blue Host Plan – Basic $3.95 per month
Click on the Blue Host link and then select Get Started, and it’ll bring you to to this page. For a blog that’s just starting out, you really don’t need anything fancy. You won’t be receiving a ton of web-traffic, so just the bare minimum is what you’re looking to get started.
After you’ve been blogging for a bit and build an audience, you can choose to upgrade as necessary, but when you’re just starting out the BlueHost Basic plan is more than enough.
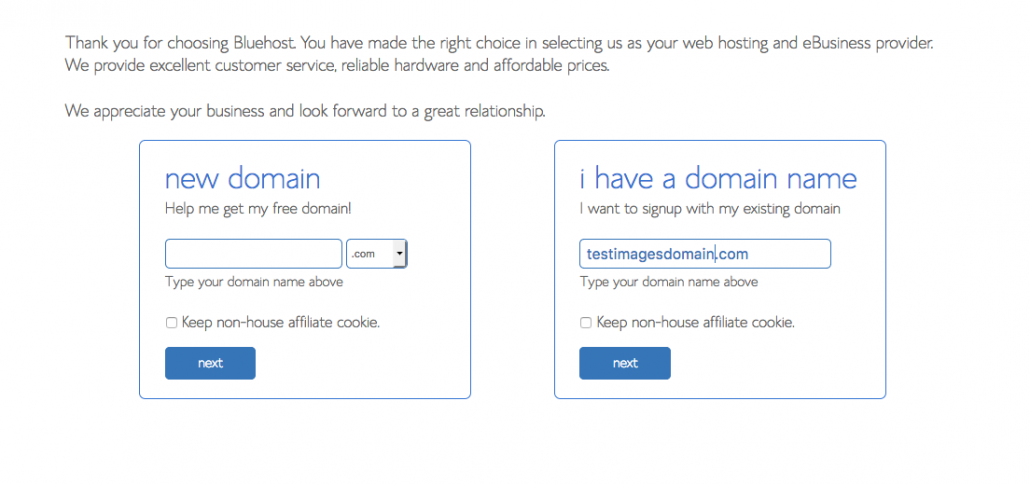
Enter Your Travel Blog Domain Name
You should have already done this during step 1 to make sure it’s available, but this is when you’ll enter it in and click NEXT. If you’ve already purchased your domain (which can be common), you would just type it in the box to the right.
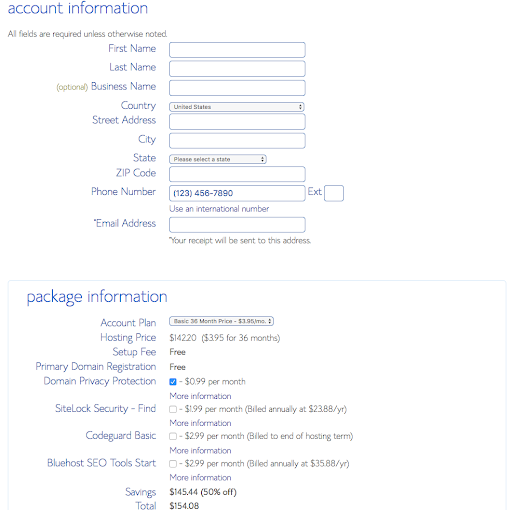
Enter In Your Account Information / Details
Be sure to enter all your details correctly, and you can untick all of the boxes at the bottom (that might be automatically checked). While it is a personal preference, I really don’t think anyone of them are necessary.
Account Plans: It’s going to give you a few options at different prices. The promo rate of $3.95 per month is only available if you choose the 36 month option. It really just depends on what you’re wanting to spend at the time
1 Year – $71.40
2 Years – $118.80
3 Years – $142.20
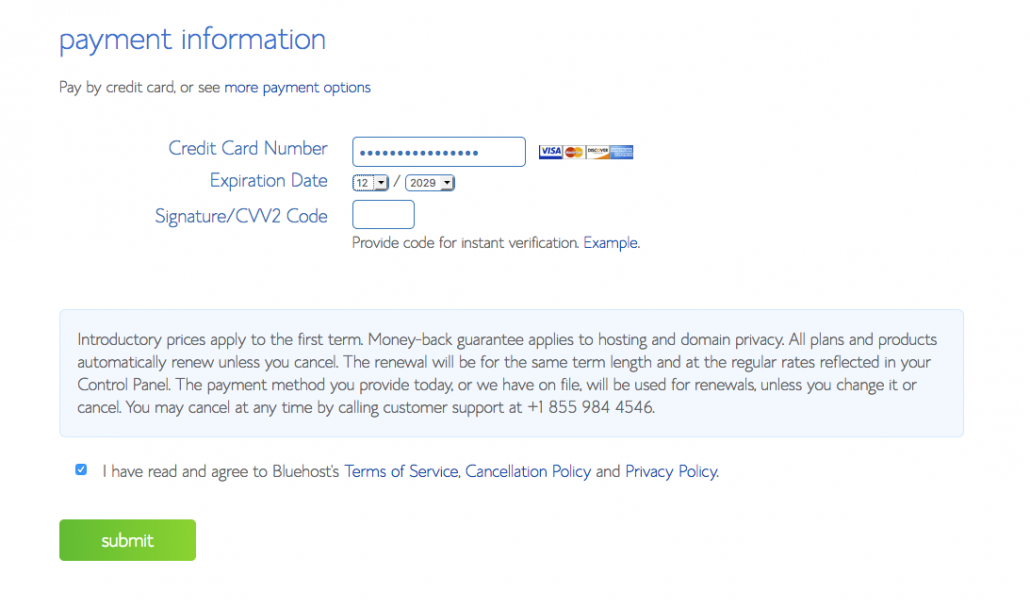
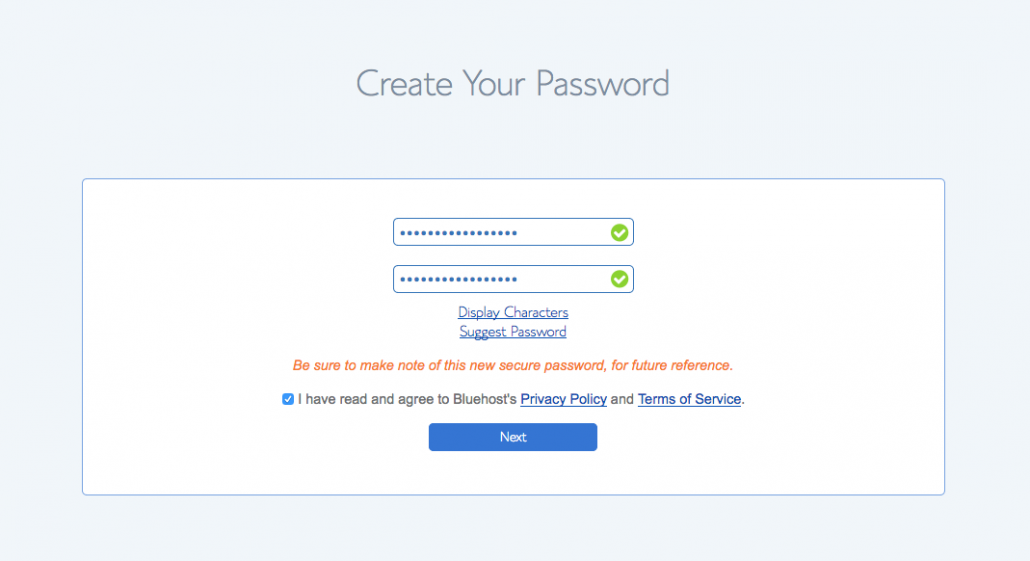
Creating Your Password
Now that you’ve paid for the web-hosting account, you’ve got to set-up your password! Make sure it’s unique to your BlueHost account, but also something easy to remember. Once you’ve got your log-in details sorted, you can move on to the next stop.
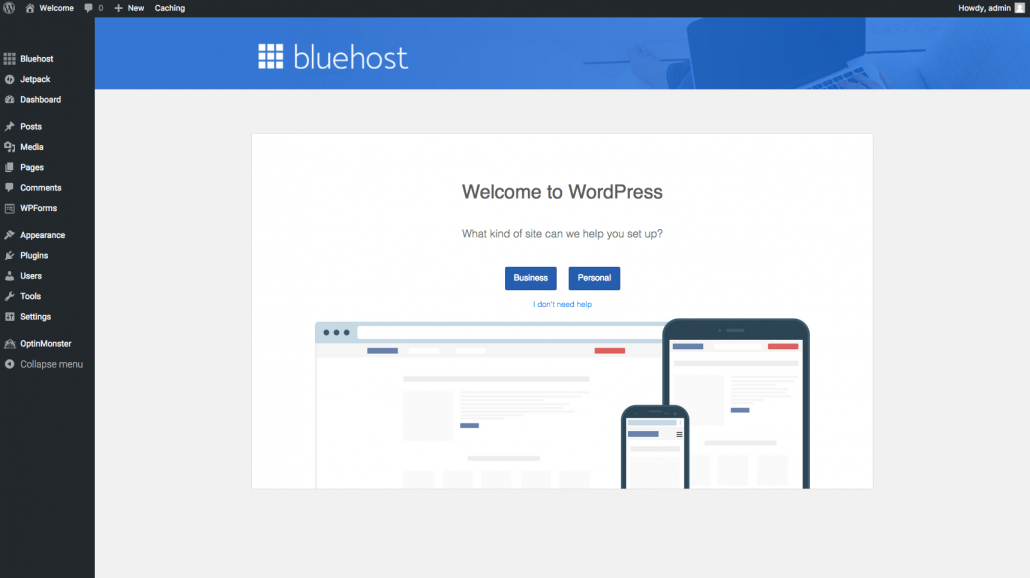
3 ) Install WordPress (The Best Blogging Platform)
Now that you’ve got your domain and web-hosting…it’s time to install WordPress, which is the best platform for travel-bloggers! I’ve been using it for over 5 years, and it’s absolutely amazing (and also a really useful skillset to have).
One of the best aspects about getting your hosting done with BlueHost is that it will automatically prompt the WordPress download, and will have you choose a theme (which you can change at anytime).
This process is also super simple with BlueHost (one of the reasons I recommend them), and their online customer service can help out if you have any questions.
4 ) Picking a WP Theme & Plugins (Designing your Website)
Your blog ready is now ready to start designing…which I think is the fun part!
What I love about Worpdress is that it’s all done through “themes”…which basically means it’s a pre-designed look for your new website.
Unless you want to hire someone to make your blog look professional, all you need to do is find the right theme & plug-ins to make your sight look awesome!
Follow these instructions:
- On the left side of your WordPress dashboard, hover over “APPEARANCES”.
- Click on “Themes”
- Test out a few of the pre-installed Themes like “Twenty Seventeen”.
You can browse through and try different themes by clicking on PREVIEW. While there are hundreds of quality free-themes, I’d recommend purchasing a Premium theme from Theme Forest. (You don’t have to do this right away though, as you can change themes once you’ve got the basics set-up).
I do think a premium theme is the way to go though, as they tend to feel and look a lot more professional, have a lot more customizable options, and typically include 12 months of customer support (which can really come in handy).
My travel-blog uses the ENFOLD Theme, and I absolutely love it! But fair warning – this is a super advanced theme that can take a bit of time to learn all of it’s power, but it’s one of the best themes out there.
Want to find which WordPress theme / plugins your favorite blog / website uses?
You can do this for free by using WPThemeDetector.com. It also has tons of great features for the most popular themes, plug-ins, and speed optimization tools. I’ve used this site quite a lot while designing my website, and it can be super fun to play around with.
WordPress Plugins
What’s a plug-in? Good question. Basically, it’s a third-party app for your website that can perform certain tasks that your theme might not included. Popular plugins tend to be for Social-Media Sharing, Related Posts, Author Boxes, Speed Optimization, Image Compression, Caching System, Security, and much more. Once you’ve gotten your theme set-up, you’ll figure out what plugins you’ll want to install next.
Have any questions about this? Always feel free to shoot me an email and I’d be happy to take a look at your new site, and give any honest feedback, critiques, and advice.
5 ) Start Writing Content (Pages, Categories, and Articles)
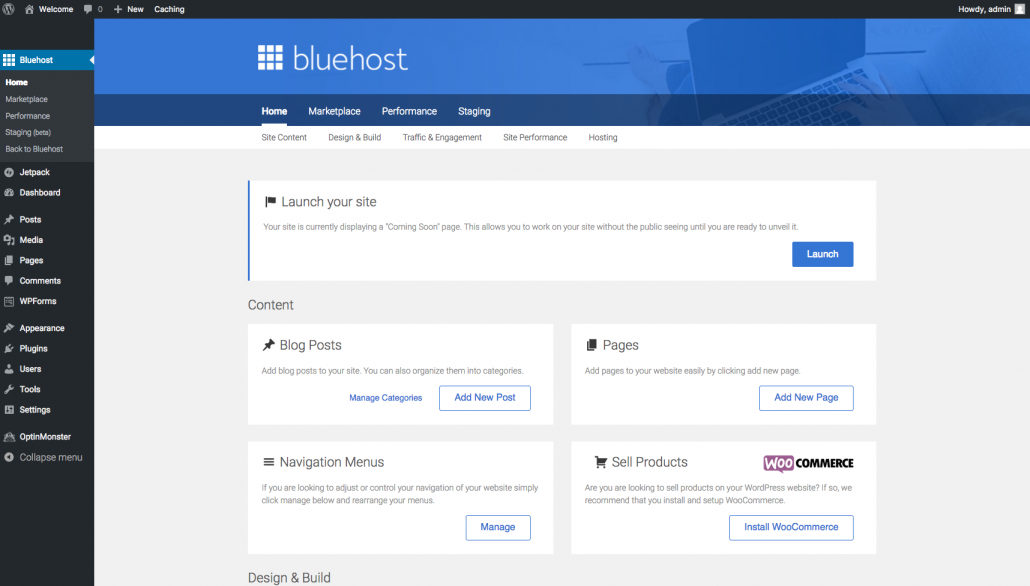
Now that you’ve gotten your domain name, web-hosting set-up, and have your WordPress Theme & Plugins installed — it’s time to actually start blogging, and you’re going do all of this is in the WordPress Dashboard!
At the top of the WP Dashboard, you’ll see a “+ NEW” drop-down…click on that, and I’d recommend starting out with your Travel Blog Pages!
Popular Travel Blog Pages For Your Website:
Those are all pretty self explanatory, and will be a great way to start building some content on your site.
Articles & Categories
Now that you’ve got some fun pages on your site, it’s time to get some fun posts on your site. The question is…what are you going to blog about?
My main piece of advice is to write about what you’re passionate about, and want to help people with.
Most of my “categories” on my site have to deal with the country / city the post is about and the type of travel / tips it involves like “photography” or “where to stay”. Does that make sense?
It might take a little time to get the grasp of WordPress, but I promise it’s actually super basic once you’ve gotten the hang of it!
That’s it! You’re Officially a Travel Blogger!!
If you’re just starting out, one of the best pieces of advice I can give you is to start getting involved with the travel-blogging community, and join a ton of Facebook groups to network with fellow bloggers.
A few of my favorite Facebook Travel-Blogging Groups are:
We Travel – We Blog – an excellent group with general travel blogging discussion, tips, and advice.
DNW – Making Money From Blogging – an amazing resource for how to make an income online.
Ultimate Pinterest Group for Travel Bloggers – if done correctly, Pinterest can be a huge traffic driver!
Thanks so much for reading!
I hope this step-by-step guide was easy to follow, and you’re excited for your upcoming travel-blogging adventure! While it does take some time to get it off the ground, it’s 100% worth it!
Once again, if you ever any questions about how to start a travel blog, tips & tricks I’ve used for my websites, or anything else — shoot me an email or message me on social-media, and I’ll be more than discuss everything!
Disclaimer: this post contains affiliate links, which means I may receive a small referral commission (at no extra cost to you).



Great article! Never had much luck blogging, might have to give it another shot! Right now I’m making 2 to 3 grand a week trading bitcoin from my smartphone. This is the article that got me into it:
https://bitfocus.weebly.com
The window of opportuntiy is closing but you can still profit if you act fast. Good luck! :)
Keep up the great content! :)